Thursday, February 14, 2013

Bacon Rosebuds


In honor of Valentine's day, I decided to try a pinterest idea that looked simply amazing...bacon roses. The original site is here, but it looked a little overly complicated. The original pin requires drilling holes in a mini muffin pan. Let's be honest...I'm not one for using power tools or ruining my kitchen items. So, I decided to try it a little differently. First, I preset the oven to 375 and prepped a cookie sheet with crinkled up tin foil so the bacon grease could soak into the creases. Next, I folded strips of tin foil over about 3 times and set them aside. Then, I rolled strips of bacon into a rose shape (1 bacon strip per rose) and wrapped the tin foil strips around them several times leaving the meatier part on the top. I arranged all the bacon roses on the cookie sheet and baked them for 50 minutes. 


For the stems, I decided to avoid the plastic that was in the original post, and I bought green plant stakes from Michael's (I'm sure they're available at any craft store). They're basically green skewers made for floral arrangements. It gives a little more natural and simpler look to the finished product since they're wood rather than plastic and don't have any leaves or thorns. Once the bacon is cooked through, I cooled them, unwrapped them, and stuck them on the sticks. Voila! A unique Valentine's day treat. 

Thursday, January 24, 2013

Snow Day Soup


This blog post is dedicated to my two snow days this week, which gave me the chance to relax, catch up on some much needed chores, and make some delicious soup. I decided to make lentil soup inspired by the lemony lentil soup at Zooroona, a middle eastern restaurant in Kalamazoo. I had not tasted it in a while, so I'll have to go back and see how it really compares, but my roommate Lisa says it's pretty close. In my typical style, I did not measure nor did I grocery shop for this particular soup. I knew I had lentils and lemons and everything else came out of the cupboard.

First, I sautéed 3 cloves of garlic and 1 small onion in the bottom of my soup pan. Once those were clearing up, I added chopped celery, carrots, and 3 medium potatoes. I'm pretty sure the original zooroona recipe does not have celery or carrots, but I wanted to sneak a few extra veggies in.

Next, I added approx 2 cups of vegetable broth (made from scratch using water and vegetable scraps and frozen until needed), 1 cup of lentils and about 4 cups of water. I seasoned it with 1 squeezed lemon, 2 bay leaves, a little cumin, salt to taste, and lots of black pepper (this was somewhat accidental; I went to sprinkle a little and a lot came out,  but it turned out well). I covered the soup and let it simmer for a good 30 minutes.

Once the kitchen started to smell wonderful, I checked to make sure the potatoes and lentils were fully cooked and removed the bay leaves. I let it cool for a little while so as not to burn myself and then blended it in the food processor with about 2 cups of coconut milk.

Voila! It tastes great. Now that I've blogged about it, hopefully I'll remember what to do for next time, possibly with some tweaks after going back to zooroona.

Sunday, May 6, 2012

Agua de Limon

As my next post back from nearly a year-long hiatus, I'd like to share a recipe for Agua de Limon (Lime water or limeade). It's easy and oh so delicious. Thanks again to Dr. Nathan Williams for his guest post to get me started. 


You'll need:
Approx 12 small limes
4 cups of water
1 cup of sugar
Makes approx 4 servings


First, wash the limes really well because you will be blending part of the peel in with all the rest. I used about a dozen small limes, but you can adjust up or down depending on how much you want to make. 


Next, peel any brown or tough spots off of the limes, leaving about half the peel. Cut them in half  and stick them in a blender (I used a food processor instead). Add 4 cups of water and 1 cup of sugar and blend for about 5 seconds. Don't blend it too much. It's supposed to still have some chunks. 


Finally, pour it through a strainer into a pitcher and serve. You may need to do some good counter-scrubbing afterwards because any spills get really sticky...
Enjoy!

Saturday, April 28, 2012

Chicken Vindaloo with Dr. Nathan Williams

It has been a LONG time since I've posted here. I've been wanting to get back into it, but the first post back was too daunting. Luckily, my good friend Nathan gave me the shove I needed and even offered to write a guest post for my return to the blogging world. He even suggested a new tagline: Fresh Endeavors...Same Ol' Blog...All New Flavor. So, without further ado, may I introduce Dr. Nathan Williams.


Fresh Endeavors…Same Ol’ Blog…All New Flavor


Guest Chef:
Dr. Nathan Williams
Christian. Audiologist. Indian food lover.


Dish:
Chicken Vindaloo


Do you enjoy Indian food but rarely eat it because of the outrageous cost of entrees at Indian restaurants? I do. In my opinion, Indian food is one of the most flavorful on the planet. Unfortunately, many dishes at Indian restaurants easily total in the $15 - $20 range. A few weeks ago I was at Target and stumbled upon the Indian food section – this was a great discovery! Today, I will walk you through preparing one of my favorite dishes. 


Two rules to cooking at my apartment:
1) Play your favorite Pandora radio station. 
2) Crack the windows to avoid activation of the smoke detector.   


Brown Basmati Rice
Boil 2 cups of water and bring to a boil. Add 1 cup of rice. Return to boil, then lower heat and cover. Simmer for 40 minutes or until all water has been absorbed. 


It’s imperative to turn on the corresponding burner with the bowl of water. Failure to do so may destroy your measuring cup...oops! 


Vindaloo Sauce
Instead of buying a plethora of ingredients that you’ll never use, visit your local Target and take a stroll down the Cultural Foods section.  There you will find Archer Farms Indian-inspired Vindaloo simmer sauce. In juxtaposition to the rice on your stovetop, pour contents into a saucepan and heat on low while the rice and chicken cook. 


Chicken 
Cook chicken thoroughly on a skillet. I used frozen chicken breast from a bag I bought at Aldi but I’m sure fresh chicken would suffice. After cooking the chicken, transfer to the saucepan of vindaloo sauce and simmer for 10 minutes. The goal is for the conclusion of this simmering step to occur in conjunction with the completion of your rice. This rarely happens here.   


Flour Tortilla
Naan would be a more appropriate bread to eat with this dish; however, I don’t have ‘naan’ (get it? double meaning!). To substitute, I will use Market Pantry flour tortillas. These can be heated in the microwave or on a stovetop skillet. The microwave option seems more convenient today. Warm for 10 – 15 seconds.  


Presentation
On a serving dish, apply bed of rice and top with chicken and vindaloo sauce combination. Enjoy with a glass of milk (you’re going to need it)! 


Chef’s Suggestions
Instead of rice, use Cous Cous. I’ve had the rice in my cupboard for a long time and am trying to get rid of it.  


A cup of flavored yogurt or a smoothie would be a great dessert to this meal.


Your comments and suggestions are welcomed! 


Nathan

Friday, August 12, 2011

Tortilla española

This is not, I repeat not, a Mexican dish. (Even though I recently returned from Mexico and LOVE the food). The Spanish (española) from its name is Spanish as in Spain, not the language. It is also not a tortilla as most Americanos think of tortilla. A better way of thinking of it would be Spanish Omelette. Most American students studying in Spain go crazy for tortilla española (it really is delish!) to the dismay of their Spanish mamás who think it's super easy and doesn't deserve the honor given it by the students in comparison with all the other wonderful things she is able to create for them. That would be equivalent to an exchange student coming here and staying with a mom who is a pro at making omelettes, quiche, and blueberry stuffed french toast, but the student only wants the scrambled eggs! That is given the assumption, of course, that Spanish mamás are fabulous cooks and most are. Mine, however, did not cook anything. We ate take out and anything that can be brought directly from the grocery store to the microwave so, sadly, I did not learn how to make tortilla española at the elbow of a wise mamá who was humoring me by teaching me this super easy dish. Instead, I bought a pretty Spanish cookbook for the pictures and used the recipe in that. My mamá actually purchased tortilla from the store (if you were a typical Spanish mamá, you would be passed out on the floor right now). It came pre-made and actually tastes pretty decent, but it's the principle of the matter. No self-respecting Spanish mamá would ever consider it. Alright enough of my reminiscing, on to the recipe. 

First step is to fry up 3-ish diced (or sliced, if your mamá told you to do it that way...) potatoes with olive oil and salt. You need to use more oil and salt than your health-conscious instincts will tell you, but it really makes it taste better. It takes about 15-20 minutes until they're cooked all the way through and you'll have to watch it to make sure they don't burn. In the meantime, you can beat about 5 eggs with more salt (yes, more salt) in a bowl. When the potatoes are ready, drain off any extra oil and pour the potatoes into the bowl with the eggs. Stir them together until they're well mixed. You can put the extra oil back in the pan (just make sure there's not too much). 

Next, pour the egg and potato mixture back in the pan and let it cook on low heat for a while until it thickens up. The trickiest part is flipping it over. It helps to use a plate so that it all stays together. Once it's brown on both sides, it's good to go. It's delicious hot or cold. This is the very basic tortilla, but it could be used as a base with other ingredients added. Some ideas: onions, mushrooms, fresh veggies, chorizo, spinach, and, if you really want to be Spanish, seafood of any and all types. If you want to turn this into a calorie overload, you can turn it into a bocadillo (a sandwich made with crusty white bread, similar to a French baguette). Just slap slices of tortilla on a roll and you're good to go. My mamá may not have cooked much, but she did give me some excellent bocadillos for our excursions, which often included the fabulous tortilla española bocadillo (not recommended for everyday consumption).  

Thursday, August 11, 2011

Grade A Challenge

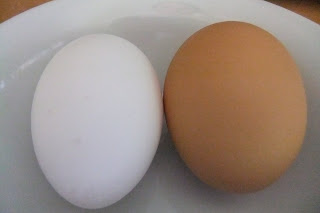
Another of the benefits of being a part of the CSA was the chance to try some farm eggs. So, today's post features a comparison of farm eggs with regular, grocery store eggs. *Props to Kristin for coming up with the title.*  
As you can see, we have our regular, grocery store egg (probably from either Meijer or Hardings) on the left and our farm egg on the right. The main difference is that the farm egg is brown and slightly bigger than the grocery store egg.

At this point, they're side by side in the pan (still with the grocery store egg on the left and the farm egg on the right). The grocery store egg was slightly more slippery when I put it in the pan. The farm egg stayed put when I cracked it into the pan and the grocery store egg moved around. 

It's starting to get hard to find any observable difference. I'm frying them over easy because that's how I like my eggs. (You know you all watched Runaway Bride and then made sure you knew how you really like your eggs...anyone with me?) 

Done and looking good. I can't wait to eat them and see if they taste any different. I wonder what the nutritional difference is between the two eggs. Any AP Chemistry overachievers out there want to do an experiment? I'll let you be a guest blogger...

Here you can see the yolks of both. It's hard to tell from the pic, but the farm egg is a slightly richer color. The taste is about the same. I tried to eat it with my eyes closed to see if I could tell and I honestly couldn't. So, in conclusion, the farm egg was slightly bigger, didn't move around the pan as much, and had a slightly deeper color yellow to the yolk. 

Tuesday, August 9, 2011

Mexican food and blueberry delights

I am back from Mexico and a teeny tiny parasite can't hold me down! Thank you to Kristin Porter for keeping up the blog while I was gone. She did a fabulous job! I'm so impressed by her actual recipe-following abilities. Perhaps we should collaborate a little more and come up with something slightly more structured than what I usually put up here. We should have a fresh batch of veggies from the farm tomorrow, so you can expect some excellent new recipes soon. For now, I'll leave you with some pics of the fabulous food I got to eat in Mexico. Some day I might try to recreate some of this stuff. 
This is chef extraordinaire Elenita. She cooks for 20 people Monday thru Friday without breaking a sweat (ok maybe she sweats, but it is Mexico afterall). Here she's putting the finishing touches on sopitos, which are small, fried tortillas with a meat mixture, lettuce, cheese, and topped off with a fabulous tomato-y broth. 

Here's a close up on the sopitos. Sooo delicious. I might have to try to make these sometime, but I doubt they could ever come close to Elenita's masterpiece. 
  
These are enchiladas made by the wonderful cooks from Pan de Vida in Ixmiquilpan. They made us the most delicious food while we stayed there. 

I'll also leave you with a few blueberry recipes I found to use some of the fresh blueberries I picked with my friends Amy and Marliese at Brookside Farms in Paw Paw. I wasn't on the ball with the camera, so I'll just pass along the recipes. I'm not quite as creative in the baking world as in the cooking world so I relied on allrecipes.com for advice. The first is for blueberry syrup, which is fantastic on pancakes, waffles, and pretty much all breakfast foods. My roommate Christine suggested putting it on ice cream, which I'm excited to try. Go here for the recipe. The second is for fresh blueberry pie that is called Five-Minute Blueberry Pie and literally takes 5 minutes. Tastes great with Cool Whip on top. Check out this link for the recipe.