Friday, August 12, 2011

Tortilla española

This is not, I repeat not, a Mexican dish. (Even though I recently returned from Mexico and LOVE the food). The Spanish (española) from its name is Spanish as in Spain, not the language. It is also not a tortilla as most Americanos think of tortilla. A better way of thinking of it would be Spanish Omelette. Most American students studying in Spain go crazy for tortilla española (it really is delish!) to the dismay of their Spanish mamás who think it's super easy and doesn't deserve the honor given it by the students in comparison with all the other wonderful things she is able to create for them. That would be equivalent to an exchange student coming here and staying with a mom who is a pro at making omelettes, quiche, and blueberry stuffed french toast, but the student only wants the scrambled eggs! That is given the assumption, of course, that Spanish mamás are fabulous cooks and most are. Mine, however, did not cook anything. We ate take out and anything that can be brought directly from the grocery store to the microwave so, sadly, I did not learn how to make tortilla española at the elbow of a wise mamá who was humoring me by teaching me this super easy dish. Instead, I bought a pretty Spanish cookbook for the pictures and used the recipe in that. My mamá actually purchased tortilla from the store (if you were a typical Spanish mamá, you would be passed out on the floor right now). It came pre-made and actually tastes pretty decent, but it's the principle of the matter. No self-respecting Spanish mamá would ever consider it. Alright enough of my reminiscing, on to the recipe. 

First step is to fry up 3-ish diced (or sliced, if your mamá told you to do it that way...) potatoes with olive oil and salt. You need to use more oil and salt than your health-conscious instincts will tell you, but it really makes it taste better. It takes about 15-20 minutes until they're cooked all the way through and you'll have to watch it to make sure they don't burn. In the meantime, you can beat about 5 eggs with more salt (yes, more salt) in a bowl. When the potatoes are ready, drain off any extra oil and pour the potatoes into the bowl with the eggs. Stir them together until they're well mixed. You can put the extra oil back in the pan (just make sure there's not too much). 

Next, pour the egg and potato mixture back in the pan and let it cook on low heat for a while until it thickens up. The trickiest part is flipping it over. It helps to use a plate so that it all stays together. Once it's brown on both sides, it's good to go. It's delicious hot or cold. This is the very basic tortilla, but it could be used as a base with other ingredients added. Some ideas: onions, mushrooms, fresh veggies, chorizo, spinach, and, if you really want to be Spanish, seafood of any and all types. If you want to turn this into a calorie overload, you can turn it into a bocadillo (a sandwich made with crusty white bread, similar to a French baguette). Just slap slices of tortilla on a roll and you're good to go. My mamá may not have cooked much, but she did give me some excellent bocadillos for our excursions, which often included the fabulous tortilla española bocadillo (not recommended for everyday consumption).  

Thursday, August 11, 2011

Grade A Challenge

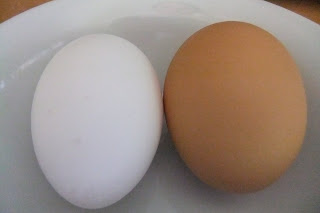
Another of the benefits of being a part of the CSA was the chance to try some farm eggs. So, today's post features a comparison of farm eggs with regular, grocery store eggs. *Props to Kristin for coming up with the title.*  
As you can see, we have our regular, grocery store egg (probably from either Meijer or Hardings) on the left and our farm egg on the right. The main difference is that the farm egg is brown and slightly bigger than the grocery store egg.

At this point, they're side by side in the pan (still with the grocery store egg on the left and the farm egg on the right). The grocery store egg was slightly more slippery when I put it in the pan. The farm egg stayed put when I cracked it into the pan and the grocery store egg moved around. 

It's starting to get hard to find any observable difference. I'm frying them over easy because that's how I like my eggs. (You know you all watched Runaway Bride and then made sure you knew how you really like your eggs...anyone with me?) 

Done and looking good. I can't wait to eat them and see if they taste any different. I wonder what the nutritional difference is between the two eggs. Any AP Chemistry overachievers out there want to do an experiment? I'll let you be a guest blogger...

Here you can see the yolks of both. It's hard to tell from the pic, but the farm egg is a slightly richer color. The taste is about the same. I tried to eat it with my eyes closed to see if I could tell and I honestly couldn't. So, in conclusion, the farm egg was slightly bigger, didn't move around the pan as much, and had a slightly deeper color yellow to the yolk. 

Tuesday, August 9, 2011

Mexican food and blueberry delights

I am back from Mexico and a teeny tiny parasite can't hold me down! Thank you to Kristin Porter for keeping up the blog while I was gone. She did a fabulous job! I'm so impressed by her actual recipe-following abilities. Perhaps we should collaborate a little more and come up with something slightly more structured than what I usually put up here. We should have a fresh batch of veggies from the farm tomorrow, so you can expect some excellent new recipes soon. For now, I'll leave you with some pics of the fabulous food I got to eat in Mexico. Some day I might try to recreate some of this stuff. 
This is chef extraordinaire Elenita. She cooks for 20 people Monday thru Friday without breaking a sweat (ok maybe she sweats, but it is Mexico afterall). Here she's putting the finishing touches on sopitos, which are small, fried tortillas with a meat mixture, lettuce, cheese, and topped off with a fabulous tomato-y broth. 

Here's a close up on the sopitos. Sooo delicious. I might have to try to make these sometime, but I doubt they could ever come close to Elenita's masterpiece. 
  
These are enchiladas made by the wonderful cooks from Pan de Vida in Ixmiquilpan. They made us the most delicious food while we stayed there. 

I'll also leave you with a few blueberry recipes I found to use some of the fresh blueberries I picked with my friends Amy and Marliese at Brookside Farms in Paw Paw. I wasn't on the ball with the camera, so I'll just pass along the recipes. I'm not quite as creative in the baking world as in the cooking world so I relied on allrecipes.com for advice. The first is for blueberry syrup, which is fantastic on pancakes, waffles, and pretty much all breakfast foods. My roommate Christine suggested putting it on ice cream, which I'm excited to try. Go here for the recipe. The second is for fresh blueberry pie that is called Five-Minute Blueberry Pie and literally takes 5 minutes. Tastes great with Cool Whip on top. Check out this link for the recipe. 


Tuesday, August 2, 2011

Refrigerator Pickles

These won't last long!
Today at the office someone passing by my door said, "refrigerator pickles." Looking back, I am confident there were a few other words involved in some greater statement surrounding those two words, but it was those two that stuck with me. And I now know that the words we speak are powerful, because those two words changed the course of my day. 

Shortly after, in an email from Farmer Pete, I received an old family recipe for (you guessed it!) refrigerator pickles. And that's when I knew this was meant to be.  So after pick up at the farm, and a quick nap (because I have been feeling under the weather), I did some swift slicing. 

This is one of the simplest recipes ever.  I think the hardest part is waiting to eat them!  Here is the recipe:

Combine the following ingredients in a glass bowl, let sit for 1+ hours. Enjoy!
  • 2 cups sliced cucumber
  • 1 medium onion sliced
  • 2 tsp salt
  • 1/2 cup Cider Vinegar
  • 1/4 cup sugar
  • 1 tablespoon dry mustard

The finished product was tart and delicious -- it even tasted pretty familiar.  We decided that the flavor reminds us a lot of Subway's sweet onion sauce.  And it tastes great on a salad!  I cut up some fresh lettuce from the farm, along with green pepper and purple carrots (they are orange on the inside) also from the farm.  Then topped it with some onion and cucumbers from the pickle jar, and a bit of ranch. 
Farm Fresh Food

This blog was happily brought to you by guest blogger, Kristin Porter.

Friday, July 29, 2011

Confessions of Mediocre Cook: Pad Thai Edition

Pad Thai by Kristin
I am fearless in the kitchen. If I am missing an ingredient for a recipe, I throw caution to the wind and throw in something else instead. Unfortunately, these experiences have often produced a less-than-spectacular product (just ask Rachael about my experiments with brownies!). Thankfully, when I am hungry, I am not a picky eater. If the dish turns out more or less okay, then I am okay with eating it. 

My Pad Thai last weekend turned out to be a classic example of my mediocrity in the kitchen. I actually considered titling this blog "Why Carrie Needs to Come Back!" As you've seen in Carrie's previous posts, she can put anything together randomly and have it come out spectacularly.  If it is possible to be gifted in recipe acrobatics, she definitely has that gene.

A friend shared a quote with me today, and it has given this mediocre cook hope to press on. In the words of Twyla Tharp, "It takes skill to bring something you've imagined into the world: to use words to create believable lives, to select the colors and textures of paint to represent a haystack at sunset, to combine ingredients to make a flavorful dish. No one is born with that skill. It is developed through exercise, through repetition, through a blending of learning and reflection that's both painstaking and rewarding. And it takes time."

So, here is my rendition of Pad Thai, along with some reflections on how to improve the dish for next time:
The Ingredients
I included in my Pad Thai: kohlrabi, green cabbage, spring onions, green beans, carrots, a pepper, bean sprouts, egg, garlic, peanuts, rice noodles, Pad Thai sauce, and for a garnish, cilantro, lime wedges and more chopped peanuts.  

First, I put water on to boil and soaked the rice noodles according to the directions on the package. 

Next, I chopped up garlic, onion, carrots, and the pepper, and fried them in a bit of oil in the wok.

Next, I chopped the kohlrabi. It was my first time using this ingredient, which I discovered is less like green cabbage than I expected. Actually, inside the texture reminded me more of an apple than the leafy cabbage I am accustomed to -- but the taste is definitely like cabbage. 
Kohlrabi  - chopped on left, whole on right

Since I know I like green cabbage, I chopped up a bit of that as well, and put the kohlrabi, cabbage and green beans in the wok to cook. 

When the veggies were softened, I drained the rice noodles and added them to the wok. 

This is where I really went wrong. With my attention on the wok, I'd neglected to watch the noodles sitting in my hot water -- I let them sit a minute or two too long, which meant that they got mooshy as they cooked even more in the fry pan with the vegetables.  Learn from my mistakes and under-cook your noodles.  You can always add more water later if you want them to soften. 

After mixing the rice noodles, I added the packet of Pad Thai sauce to the wok, along with a handful of chopped peanuts and a couple handfuls of bean sprouts. 

Then, because my wok was so full, I took out a separate pan to scramble two eggs. Usually, for a recipe like this, I would push the noodles to the side and fry the egg in the same pan (I hate washing unnecessary dishes!)

After a few minutes, the egg was cooked and ready to be added to the wok.  

Finally, I dished out a serving, and garnished with chopped peanuts, cilantro, and a wedge of lime to squeeze over the dish right before eating.

As I enjoyed my Pad Thai (remember, I'm not a picky eater, so overcooked noodles do not discourage me), I considered how well this recipe may have turned out in the hands of a more skilled cook / blogger. But then again, if what Twyla says is true, there is hope for me yet, and my cooking skill may just need time and repetition before it can be perfected. 

This recipe was gladly brought to you by guest blogger, Kristin Porter.


Friday, July 22, 2011

Un Sueño de México

Fish Tacos!
This week, Carrie is visiting a place in Mexico that is equally dear to both our hearts, the orphanage Hogar de Amor y Protección al Niño. While part of me is extremely happy for Carrie’s travel opportunity (as well as excited that she has honored me with the chance to serve as “guest blogger” here!), I will admit (just between me and you and the world wide web) that I feel at least as much jealousy as I do joy over her trip.

With that on my mind, it was inevitable that my first blog carry a “south of the border” flavor.  Ariel Porter (a good friend, but no relation, although we share a last name!) happened to be available this week, and is one of the most amazing amateur chefs that I have ever known. She shares my love for foreign foods, and makes the most fantastic fish tacos I have ever tasted!  A big thanks to her for bringing the salmon, seasonings, and skills to the kitchen – I really enjoyed spending the afternoon with you!

I have one disclaimer before we go further: I decidedly cannot vouch for the authenticity of this dish (in all my journeys to Mexico, I have never been offered a single fish taco), but all the same I think you will agree with me that these fish tacos are "muy deliciosos."  And in my case, they are a small consolation for remaining home while others go abroad :)   

A few of the necessary ingredients for salsa verde
First, I began by preparing a homemade Salsa Verde (this recipe is straight from a friend’s mom in Mexico and will make you never want to use store bought salsas again).

I started with one pound of Tomatillos and a Serrano Pepper. If you like your salsa hot, feel free to add extra peppers here. For those unfamiliar with Tomatillos, they are tomato-like, but have a soft husk on the outside that you remove before cooking. The skin under the husk is sticky, so I rinsed them well before putting them in the pot of water and on the stove to boil. 
I can almost taste it already!
After boiling (you will notice a color change in the Tomatillos when they are ready), I removed the Tomatillos from the water and put them in the food processor, along with: 1/4 of a sweet onion, 2 fresh cloves of garlic, and half a bunch of cilantro (washed and the leaves removed from the stems). I like my salsa very mild, so I removed the seeds from the Serrano before adding it in the food processor. 
Ready to blend
After blending, I fried the blended sauce mixture in a bit of oil in the fry pan, then added salt and Knorr brand Chicken Flavor Bouillon to taste. After a few minutes cooking, it’s ready to eat hot or can be cooled and refrigerated for later.
Where are those tortilla chips?
Now for the tacos!

Ariel brought along fresh salmon from Lake Michigan, so we enjoyed the best this state has to offer! First, she covered the fish with Ancho Chile Pepper Powder. We skipped the salt because the salsa had plenty already, but you may prefer to add salt to the salmon as well. Next, we pan fried the fish in a bit of olive oil (4-5 minutes per side).  We put the cover on the pan after we flipped the fish to help it cook all the way through.
Ready to pour!
Cooked to perfection!
While the salmon cooled a bit, we set to work cutting up the toppings: Cabbage and a Serrano Pepper (from Delano Farms CSA), along with cucumber, sweet onion, cilantro, and lime wedges for squeezing juice over the tacos.
Cabbage, Cucumber, Onion, Cilantro, Serrano Pepper, Lime
Next we got our hands dirty (one of Ariel’s signature cooking methods!) and broke the cooked salmon into small pieces, while also being careful to take out any bones that lingered in the meat.
Careful, it's hot!
We warmed the tortillas...
Set the table…
Compiled our tacos…
And scraped the plate clean! 
 

This blog was gladly brought to you by guest blogger, Kristin PorterThanks for reading!


Wednesday, July 13, 2011

Italian Summer Squash Casserole

Ready to serve
This week, we used our summer squash, zucchini, and fresh basil from the farm to make one of my favorite dishes. My variation of the recipe has changed over the years, but the original was made by my former roommate's sister Laura when she came to visit us. (Shout out to all the Littlejohns who follow this blog!) It has the flavor of lasagna, but no noodles or meat. 


Fresh ingredients

Start with two summer squashes and two zucchinis, cut in half lengthwise and then sliced. Also cut up 1/2 an onion and fresh mushrooms (sliced or quartered). Saute the onions in a large sauce pan (and I mean LARGE...I usually use our wok because there are so many veggies. They do cook down, but it starts out overflowing) until they start to turn clear and then add the zucchini, squash, and mushrooms and pour in about 1 1/2 cups of vegetable broth. While that is cooking, mix together about 3/4 of a 24 oz container of cottage cheese, 3 eggs, a few shakes of Parmesan, and 2/3 of a 12 oz package of mozzarella cheese (save the rest of the mozzarella to sprinkle on top of the casserole). You'll also need the pasta sauce of your choice and fresh basil leaves.
All of the layers

Start layering the ingredients into a 9x13 dish. I usually use this pattern: sauce, 1/2 the veggies, 1/2 the basil, all the cheese mixture, more sauce, remaining veggies, remaining basil, more sauce, remaining mozzarella cheese. Really it all kind of mixes together though, so do it how you want. Make sure you drain any remaining broth/liquid from the veggies with a slotted spoon though otherwise it can get pretty runny. Bake it at 350 for an hour. Turns out delicious and makes great leftovers!
The layering process


Tuesday, July 12, 2011

Olive Garden Copycat Soup

Some people think that summer soup is never appropriate, but I like it once in a while. This week we got red-skinned potatoes and kale from the CSA so I thought I would make one of my favorite soup recipes. I got this recipe from a fabulous cook and friend from church named Cathy. I used some of her modifications/expert tips. It's a copycat of the Toscana Soup from Olive Garden. 


First, you bake spicy Italian sausage for about 25 minutes at 300 degrees or until it's cooked through. It helps to cook it on crumpled tin foil so that the fat drains into the creases. 


In the meantime, begin chopping about 1/2 an onion, 2 cloves of garlic, 3-4 medium red-skinned potatoes (I cut off the blemishes and left the skin on, but you could peel them if you don't like the skins), and 6-8 leaves of kale, chopped into thirds or quarters depending how big the leaves are. We had Russian Red Kale from the farm, but I've used the curly kind before when I've made this recipe. Both work out well. After the sausage is cooled, chop it into slices. Saute the onions and garlic in a stock pot with a little bit of olive oil. When the onions become clear, add the cooked, sliced sausage and saute together. Next, add the sliced potatoes and about 1 quart of vegetable broth. Bring to a boil and turn down to simmer on low for about 15 minutes or until potatoes are fully cooked. Add 1/3 cup of heavy whipping cream and the kale and simmer for another 4 minutes. Make bread sticks and salad to go with it and you can have your own unlimited soup, salad, and bread sticks meal at home. 


Wednesday, July 6, 2011

What do I do with all of this mango chutney?

After making the Thai lettuce wraps, I had tons of mango chutney leftover. I decided to make a fruity chicken dish. I thawed a frozen chicken breast, sprayed a pan with nonstick cooking spray, and added the chicken breast and mango chutney to cook. 
Once the chicken was starting to brown, I turned the heat down to low, added about a 1/2 cup of vegetable broth to keep it moist (any kind of broth would work - we just have lots of veggie broth around because Kristin makes her own), and covered it for 15 minutes or so. In the meantime, I made some long grain rice in our rice maker. I never thought I would be such a proponent of rice makers, but they are super easy. It comes out perfectly every time and you don't even need to watch it! 
When the chicken was cooked all the way through and still tender, I put it on a plate with a little rice. It turned into a pretty good semi-leftovers meal. 

Saturday, July 2, 2011

Thai Lettuce Wraps with Mango Chutney

We had some lettuce this week from the farm so naturally my first thought was to make Thai lettuce wraps. I was first introduced to the concept of Thai lettuce wraps by my friend Annie when we went to a quirky little restaurant in Grand Rapids called The Winchester. They were amazing and I started thinking that I could possibly make these at home. I had them again at P.F. Chang's and was unimpressed. The overall flavor wasn't as good and they used iceberg lettuce instead of romaine, which in my opinion dumbs down the dish. After the P.F. Chang's experience, I tried them at home with good results, but I thought I could do better. My first attempt at the sauce was a little too salty because I went overboard on the soy sauce (I had basically just thrown anything that seemed Thai-like into the pot -- turned out good but not great). My roommate Kristin insists they were still excellent, but I wanted to try again. 


So, this week's lettuce wraps were round 2 for me with some necessary improvements from my earlier recipe. But, I'm going to start by describing the mango chutney I made to go with it. This was a first for me so I got some guidance from a Google search, which led me to this recipe from the Food Network, and went from there. What I actually ended up doing was based on the recipe with my own tweaks and alterations.

First, I peeled and chopped 4 mangoes while my lovely assistants Beth and Kristin chopped 1 red bell pepper and about 1/3 of a medium-sized red onion. I put a little olive oil in a saucepan (enough to lightly cover the bottom) and toasted some red pepper flakes (add more or less depending on how hot you want the chutney). Then I added my onions and peppers with a shake of ground ginger. I'm not a huge fan of ginger so I toned that way down from the Food Network recipe. I let that cook (thank you Beth for stirring) while I mixed up about 2 cups of pineapple juice, 3/4 cup of cider vinegar, 1/2 cup of brown sugar, and 1 Tablespoon of yellow curry powder in a separate bowl. (I actually measured it out. Can you believe it?). I poured the liquid mixture into the saucepan and let it simmer for about 30 minutes on low heat. I added a handful of raisins when it was about done and let it simmer for about 5 more minutes. Then I cooled it down in an ice bath and voila, it was done!

I was actually making the chutney at the same time that I was making the Thai lettuce wraps and the timing was a little off so it might be a good idea to make the chutney in advance since it takes longer. The Thai lettuce wraps were made with ground turkey that was browned (although turkey doesn't get brown so much as gray) and drained. Then, I started mixing the sauce ingredients right into the pan with the meat (why dirty another bowl, right?). This part of the recipe was completely made up but with changes from my previous attempt. I started with equal parts soy sauce (low sodium) and oyster sauce (available in the international section of the grocery store). I used about 1/4 cup of each. I added a Tablespoon of hot Chinese mustard (also in the international section) and a few good shakes each of curry powder and cumin. Then, I poured in about a cup of vegetable broth (homemade by my roommate Kristin...maybe that would be a good guest blog appearance for later...) and let it all cook together until the liquid was pretty much cooked off. 

While all this was going on, Kristin had been faithfully chopping up our garnishes of thinly sliced carrots, water chestnuts, and spring onion (I know it's a red onion in the picture...it just looked nicer and we used it in the chutney). We used our lettuce from the farm piled with the Thai turkey mixture, carrots, water chestnuts, onion, and mango chutney. Our lettuce leaves from the farm were pretty small to hold all that and we didn't have enough for all of the people that were over, so we supplemented with some romaine lettuce. Both lettuce types were great. It's a messy meal and tends to spill out while eating it, but definitely worth it. It usually works best to leave enough leaf available to fold over (not like the picture below). 

These were extra difficult to eat because they're piled so high

Wednesday, June 29, 2011

Elderberry Flowers...Much less sinister than the Elder Wand

This week's pick up included elderberry flowers. They're commonly used in Eastern Europe for desserts because of their sweetness. We smelled them and Kristin had the genius idea to make an apple crisp. The smell of them seemed like it would go well with apples so we thought we'd give it a try.


We started by peeling and cutting up Gala and Golden Delicious apples (my mom always says it's best to use more than one kind of apple for baking). We piled them in a baking dish and mixed in the elderberry flower blossoms with a sprinkle of cinnamon and several pats of butter on top.


We mixed up the crumbles for the top using cinnamon, sugar, nutmeg, a combo of wheat and white flour, and butter (or the butter substitute of your choice). We intended to put oatmeal in it too, but forgot...whoops! It was sprinkled on the top and baked at 325 for about a half hour. 


It turned out fabulous. The elderberry flowers give the apple crisp a delicate, flowery taste. If you can get your hands on some elderberry flowers, I'd definitely recommend making an apple crisp. They're also commonly used in pancakes, crepes, compotes, and teas, which I'd love to try next time though. 


For anyone wondering about my nerdy reference in the title of this blog, you can go read up on the Elder Wand